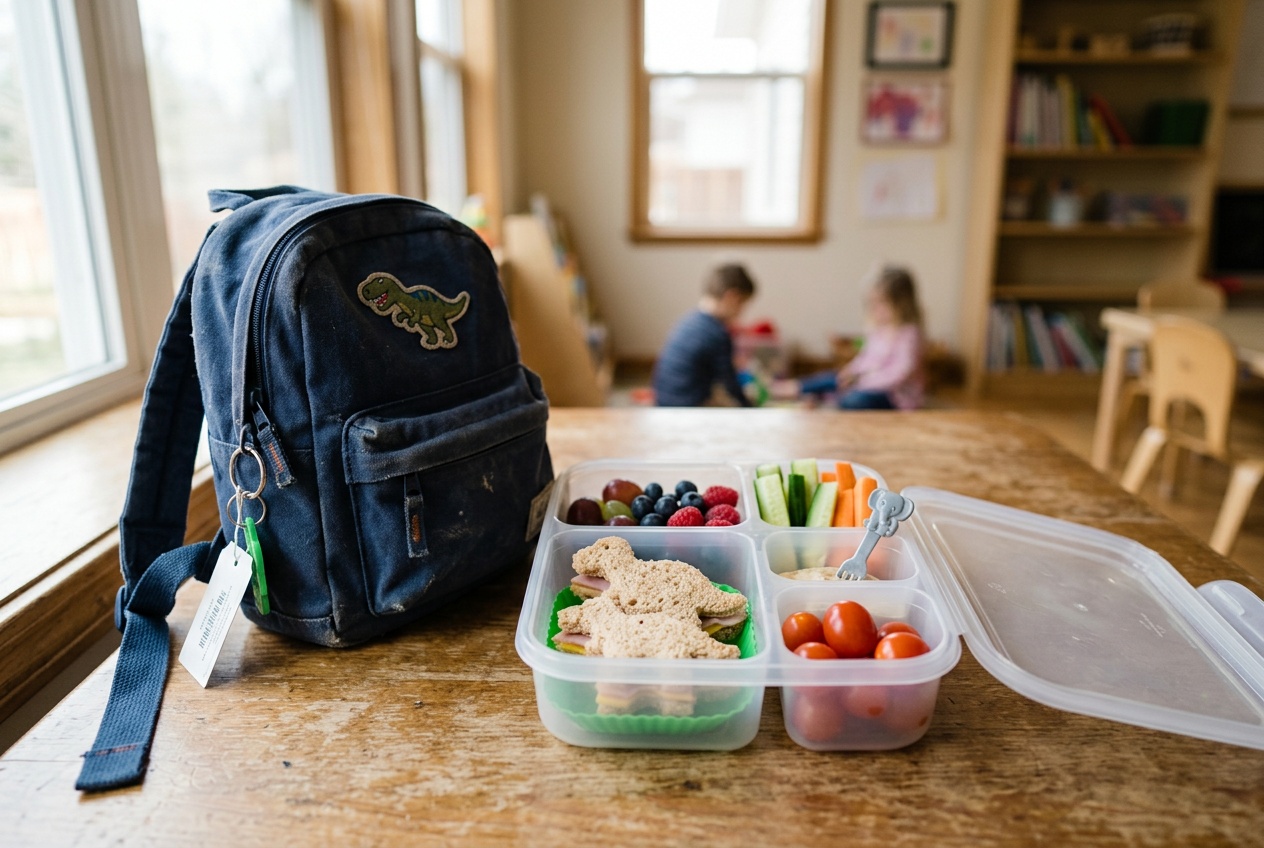
Packing a school lunch doesn’t have to be boring or stressful. Bento boxes let you create fun, balanced meals by dividing different foods into separate compartments, making it easier to include variety and nutrition in every lunch. I’ve found that kids actually get excited about opening their lunch when it looks colorful and interesting.
The best part about bento lunches is that you don’t need to be a chef or spend hours in the kitchen. I’ll show you how to pick the right containers, balance nutrition without overthinking it, and make your food look appealing with simple tricks. You’ll also learn quick recipes and prep strategies that work for busy mornings.
Whether your child is a picky eater or you want to reduce lunch waste, this guide covers practical solutions. I’ll walk you through everything from basic tools to seasonal ideas that keep lunches fresh and exciting all year long.
Essential Tools and Containers
The right bento box and tools make packing lunches faster and keep food fresh until lunchtime. I focus on containers that are durable, safe, and easy for kids to open.
Choosing the Right Bento Box
I recommend starting with a box that holds 3 to 4 cups of food for elementary-aged children. This size gives enough space for a main dish, fruit, vegetables, and a small treat.
Look for boxes with secure lids that don’t leak. Many bento boxes have removable dividers or built-in compartments. These keep different foods separate so flavors don’t mix.
Key features I prioritize:
- BPA-free plastic or stainless steel materials
- Dishwasher-safe construction
- Easy-open latches that kids can manage independently
- Microwave-safe options if your child will reheat food
I find that boxes with 2-3 compartments work best for most kids. Single-compartment boxes need separate containers inside, which adds bulk.
Utensils and Accessories
I pack child-sized utensils that fit inside the bento box or attach to the lid. Small forks and spoons are easier for kids to handle than full-sized versions.
Silicone cupcake liners work well as dividers within larger compartments. I use them to separate wet foods from dry snacks. Food picks and small skewers make plain foods more fun to eat.
Essential accessories include:
- Sauce containers (0.5 to 1 ounce) for dips and dressings
- Reusable sandwich bags for crackers or chips
- Small ice packs to keep food cold
- Food-safe markers for labeling
I keep extra napkins and a small cloth for spills in a side pocket.
Food Storage and Safety
I use an insulated lunch bag with at least one ice pack to maintain safe temperatures. Foods need to stay below 40°F to prevent bacterial growth.
Pack cold foods straight from the refrigerator. I freeze juice boxes or water bottles to use as extra ice packs. They thaw by lunchtime and stay cold.
Hot foods should be above 140°F when packed. I preheat thermoses with boiling water for 5 minutes before adding hot food. This keeps soups and pasta warm for 4-5 hours.
Wash all containers daily with hot soapy water. I replace worn containers that have cracks or broken seals.
Planning Balanced Nutrition
A good bento box needs protein, vegetables, fruits, grains, and healthy fats in the right amounts for your child’s age. I also account for any food allergies or special diets when I plan my kids’ lunches.
Incorporating Food Groups
I make sure each bento box includes at least one food from each major group. For protein, I add chicken, hard-boiled eggs, tofu, beans, or cheese. These help kids stay full and give them energy.
I fill about half the box with fruits and vegetables. Carrots, cucumbers, bell peppers, and cherry tomatoes work well because they’re easy to eat. For fruits, I choose berries, apple slices, grapes, or mandarin oranges.
Whole grains give kids lasting energy through the afternoon. I include brown rice, whole wheat crackers, pasta, or a small sandwich on whole grain bread.
I add a small amount of healthy fat like avocado, nuts (if allowed), or hummus. These help kids absorb vitamins and keep them satisfied.
Allergies and Dietary Restrictions
I always check with my child’s school about their allergy policies before packing lunch. Many schools ban peanuts and tree nuts completely.
Common food allergies I watch for include milk, eggs, soy, wheat, fish, and shellfish. I read every food label carefully because allergens hide in unexpected places. For example, some lunch meats contain milk products.
If my child has dietary restrictions, I find simple swaps. I use sunflower seed butter instead of peanut butter. For dairy-free diets, I pack coconut yogurt or dairy-free cheese. Rice or corn crackers replace wheat crackers for gluten-free needs.
I label the bento box with my child’s name and list any serious allergies on it.
Portion Sizes for Kids
I adjust portions based on my child’s age and appetite. A five-year-old needs less food than a ten-year-old.
General portions by age:
- Ages 4-6: 1 cup vegetables, 1 cup fruit, 2-3 oz protein, 1/2 cup grains
- Ages 7-10: 1.5 cups vegetables, 1.5 cups fruit, 3-4 oz protein, 1 cup grains
- Ages 11-13: 2 cups vegetables, 1.5 cups fruit, 4-5 oz protein, 1.5 cups grains
I pack slightly less than I think my child will eat at first. Kids can always ask for more at snack time. Too much food in a lunch box often comes back uneaten and wasted.
Creative Presentation Techniques
Making bento lunches visually appealing encourages kids to eat their food and makes lunchtime more exciting. I focus on three key areas: using bright colors, creating fun shapes, and adding small decorative touches that transform ordinary food into something special.
Colorful Arrangements
I arrange foods by color to create visual interest in the bento box. Bright reds, greens, yellows, and oranges naturally draw kids’ attention and make the lunch look fresh.
I group similar colors together or create rainbow patterns across the box. Cherry tomatoes, carrots, bell peppers, and berries work well for this. I place darker items like grapes or blackberries next to lighter foods like cheese or crackers to make each item stand out.
The contrast makes it easier for kids to see what’s in their lunch. I also use the natural colors of fruits and vegetables instead of relying on artificial food coloring. Purple cabbage, orange carrots, yellow corn, and green edamame give me plenty of options.
I avoid putting too many brown or beige foods together. If I pack chicken nuggets or crackers, I balance them with colorful fruits or vegetables nearby.
Fun Shapes and Characters
I use cookie cutters to transform sandwiches, cheese, and fruits into stars, hearts, circles, or animal shapes. Kids respond well to familiar shapes and characters they recognize.
Small circle cutters work great for making mini sandwiches or cutting cheese into polka dots. I press cutters firmly through bread, deli meat, or thin melon slices. The leftover scraps don’t go to waste—I save them for snacks or add them to the box as finger foods.
I create simple faces using food items. Two blueberries become eyes, a small piece of cheese makes a nose, and a grape slice forms a smile. I can do this on top of rice, a sandwich, or even a pancake.
Hard-boiled eggs cut in half can become animals with the addition of small vegetable pieces. I add carrot ears to make bunnies or use nori seaweed to create penguin faces.
Using Decorative Picks and Dividers
I use food-safe picks to hold small items together and make them easier to eat. These picks come in many shapes like animals, flags, or simple colors.
Picks work well for:
- Holding sandwich quarters together
- Skewering cheese cubes and grapes
- Keeping rolled deli meat in place
- Making fruit kebabs bite-sized
I place silicone dividers or paper cups in the box to keep foods separated. This prevents wet items from making crackers soggy or keeps strong-smelling foods away from mild ones.
Small silicone cups in different colors add visual separation and make the box look organized. I use them for dips, sauces, small portions of nuts, or berries that might roll around. The cups are reusable and easy to clean, which saves money over disposable options.
Simple Recipes for Every Day
Making bento lunches gets easier when you have go-to recipes that work every time. These simple options use basic ingredients and take less than 15 minutes to prepare.
Quick Sandwich and Rice Ball Ideas
I make mini sandwiches by cutting regular sandwiches into four squares or using cookie cutters for fun shapes. Peanut butter and jelly, cream cheese and cucumber, and turkey with cheese are my most-used fillings.
Rice balls work great because kids can eat them with their hands. I form cooked rice into small balls or triangles while it’s still warm. Inside each ball, I add a small piece of cooked salmon, tuna mixed with mayo, or a pickled plum.
Easy Rice Ball Steps:
- Wet your hands with water
- Place 2-3 tablespoons of rice in your palm
- Add filling in the center
- Shape into a ball or triangle
- Wrap with a strip of seaweed if desired
Vegetable and Fruit Options
I pack vegetables that kids actually eat without complaint. Cherry tomatoes, cucumber slices, and baby carrots need no preparation. Steamed broccoli florets and snap peas work well when cooked for just 3 minutes.
For fruit, I choose items that won’t brown or get mushy. Grapes, berries, orange segments, and apple slices with lemon juice stay fresh. I cut everything into bite-sized pieces so kids don’t struggle with big chunks.
Best Veggie Choices:
- Bell pepper strips (red, yellow, or orange)
- Edamame (cooked and cooled)
- Corn kernels
- Sugar snap peas
Protein-Packed Mains
I rotate between different proteins to keep lunches interesting. Hard-boiled eggs take 10 minutes to cook and last five days in the fridge. I slice them in half or cut them into quarters.
Chicken nuggets made at home use small chicken pieces coated in breadcrumbs and baked for 15 minutes. Meatballs work the same way and can be made in batches.
For quick options, I use deli meat rolled up with cheese inside. Cheese cubes alone provide protein too. Cooked shrimp, cut into smaller pieces, takes only 2-3 minutes in a pan.
| Protein | Prep Time | Storage |
|---|---|---|
| Hard-boiled eggs | 10 minutes | 5 days |
| Baked chicken pieces | 15 minutes | 3 days |
| Mini meatballs | 20 minutes | 4 days |
| Cooked shrimp | 3 minutes | 2 days |
Meal Prep Tips for Busy Parents
Making bento lunches doesn’t have to take hours each morning. I focus on preparing ingredients ahead of time and using smart packing methods to save precious minutes during hectic school mornings.
Batch Cooking Staples
I cook large batches of basic foods on Sunday afternoons to use throughout the week. Rice, pasta, and quinoa store well in the fridge for up to five days and work as bases for different bento combinations.
I also prepare proteins in advance. Grilled chicken strips, hard-boiled eggs, and meatballs can be cooked once and portioned into containers. These stay fresh for 3-4 days and reheat quickly.
Chopped vegetables are another time-saver I rely on. I wash and cut carrots, cucumbers, bell peppers, and cherry tomatoes right after grocery shopping. I store them in airtight containers with damp paper towels to keep them crisp.
I freeze some items in individual portions too. Mini pancakes, rice balls, and cooked sausages freeze well and thaw overnight in the fridge.
Time-Saving Packing Strategies
I set up a bento packing station in my kitchen with all supplies in one spot. This includes bento boxes, dividers, sauce containers, and food picks stored together in a drawer or basket.
I pack dry items the night before. Crackers, dried fruit, nuts, and cookies go into the bento box and sit on the counter overnight. In the morning, I only add fresh items like fruit and anything that needs refrigeration.
My morning packing order:
- Add the main dish (leftover pasta, sandwich, rice)
- Fill in with proteins
- Add fresh vegetables and fruit last
I use silicone cupcake liners as dividers instead of buying special separators. They’re cheap, reusable, and keep foods from touching.
Encouraging Kids to Try New Foods
Getting kids to eat new foods takes patience and smart planning. Making small changes to familiar dishes and letting kids help in the kitchen can make them more willing to try different ingredients.
Introducing Variety
I start by adding one new food at a time to my child’s bento box alongside foods they already enjoy. This approach feels less overwhelming than presenting an entire lunch of unfamiliar items.
I cut new foods into fun shapes using cookie cutters or arrange them in patterns. A star-shaped cucumber slice or cherry tomatoes arranged like a caterpillar often gets more attention than plain vegetables. Bright colors also help, so I include foods like orange bell peppers, purple cabbage, or yellow corn.
I keep portions of new foods small at first. A few pieces of a new fruit or vegetable is enough for a child to taste without feeling pressured to finish a large serving.
Tips for introducing new foods:
- Pair new items with favorite foods
- Try the same food prepared different ways (raw carrots vs. cooked)
- Repeat new foods multiple times, as kids often need 8-10 tries before accepting something
- Use mild seasonings before adding stronger flavors
Involving Children in Preparation
I let my kids help pack their bento boxes when possible. They can choose between two healthy options, like asking “Do you want grapes or apple slices today?” This gives them control while keeping choices nutritious.
Shopping together helps too. I take my children to the grocery store and let them pick one new fruit or vegetable to try each week. When they select the food themselves, they feel more invested in tasting it.
I show my kids how to assemble simple bento items like rolling deli meat, threading fruit on small picks, or arranging crackers. These tasks build their confidence and make them proud of their lunch. Kids who help prepare food are more likely to eat it.
Sustainable and Eco-Friendly Practices
Making bento lunches gives you a chance to cut down on waste and choose options that are better for the planet. I focus on containers I can use again and again, and I plan meals to avoid throwing food away.
Reusable Packaging Solutions
I always pack my kids’ bento lunches in containers made from stainless steel, glass, or BPA-free plastic that can be washed and reused. These lunch boxes last for years, which means I’m not buying disposable bags or wraps every week.
For smaller portions, I use silicone cups and dividers instead of paper liners. Silicone bento cups come in different sizes and colors, and they go right in the dishwasher after each use.
I pack drinks in reusable water bottles and avoid single-use juice boxes. Metal or plastic bottles with tight lids work well and keep drinks cold until lunchtime.
Reusable items I recommend:
- Stainless steel or glass bento boxes
- Silicone food cups and separators
- Cloth napkins instead of paper
- Reusable utensils made from bamboo or metal
- Insulated food containers for hot meals
Reducing Food Waste
I measure portions carefully to match what my kids actually eat at lunch. Packing too much food means more gets thrown away, so I start with smaller amounts and adjust based on what comes back home.
Leftovers from dinner make great bento ingredients the next day. I save small amounts of rice, vegetables, and proteins in the fridge specifically for lunch boxes.
I check what foods are close to expiring and use those first in bento lunches. Soft fruits get turned into skewers, wilting vegetables go into fried rice, and day-old bread becomes sandwich shapes.
Seasonal and Themed Bento Inspirations
I like to match bento boxes to the seasons and special occasions throughout the year. This makes lunch more exciting for kids.
Spring themes work well with cherry blossom designs, Easter eggs, or garden vegetables. I use pink rice colored with beet juice and cut cucumbers into flower shapes.
For summer, I create beach scenes with blue rice (using butterfly pea flower) as water and fish-shaped sandwiches. Watermelon slices and star-shaped fruits fit this season perfectly.
Fall bentos can feature Halloween pumpkins, autumn leaves, or back-to-school themes. I use orange cheese and carrots to make pumpkin faces. Brown rice works great for fall colors.
Winter brings opportunities for snowman bentos, holiday characters, and warm comfort foods. White rice naturally makes good snowmen with small vegetable details.
Popular themed ideas throughout the year:
- Animals (pandas, bears, cats, dogs)
- Cartoon characters
- Sports themes
- Birthday celebrations
- Rainbow colors
- Space and planets
I find that simple themes work better than complicated ones. Kids recognize basic shapes and colors easily.
Theme matching doesn’t require special tools. I use cookie cutters, kitchen scissors, and small straws to create shapes. Food picks and decorative cups add quick themed touches without extra work.
The key is planning ahead. I choose my theme the night before and prep ingredients that need cutting or shaping. This saves morning time when I’m packing the actual bento box.