Turn everyday materials into enchanting winter scenes that capture the magic of snow and create lasting memories for your family
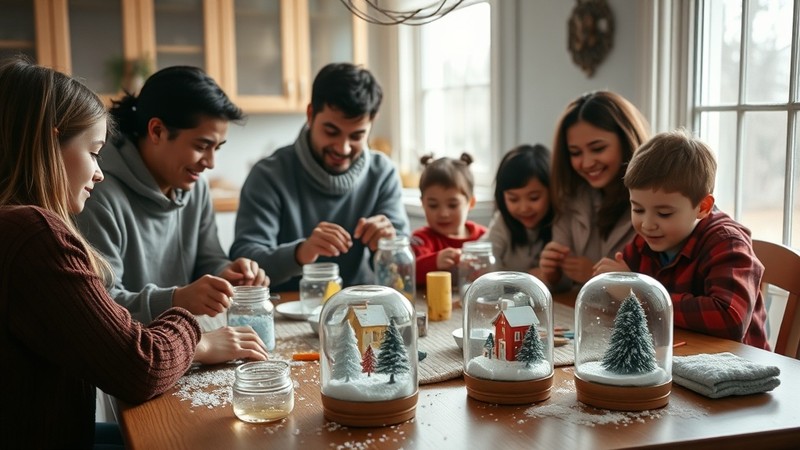
There’s something truly magical about watching snow swirl inside a glass globe, creating miniature winter wonderlands that captivate both children and adults alike. While winter may come and go across Canada, the joy of creating your own snow globes can bring that snowy enchantment into your home any time of year. This timeless craft project combines creativity, science, and family bonding into one delightful activity that’s easier to accomplish than you might think.
Making snow globes at home offers families a wonderful opportunity to spend quality time together while creating personalized keepsakes or thoughtful gifts. Whether you’re planning a rainy day activity, preparing handmade presents for the holidays, or simply looking for a creative outlet with the kids, this project delivers both the satisfaction of crafting and the joy of watching your creation come to life with each gentle shake.
Why Homemade Snow Globes Make Perfect Family Projects
Creating snow globes together offers numerous benefits beyond just the finished product. This craft encourages children to use their imagination while developing fine motor skills and learning about basic scientific principles like density and suspension. The process also teaches patience and attention to detail, as each step requires careful consideration and gentle handling.
From a practical standpoint, homemade snow globes make excellent gifts that recipients will treasure for years to come. Unlike store-bought versions, your custom creations can be personalized with meaningful figurines, family photos, or themed decorations that reflect the recipient’s interests and personality. They’re also budget-friendly, using mostly materials you likely already have around the house.
Understanding the Science Behind Snow Globes
Before diving into the crafting process, it’s helpful to understand what makes snow globes work. The “snow” effect is created by particles suspended in liquid that fall slowly due to gravity and fluid dynamics. The viscosity of the liquid—how thick or thin it is—determines how quickly the particles fall. Water alone makes particles fall too quickly, while oil or glycerin creates that dreamy, slow-motion effect we associate with professional snow globes.
The key to successful homemade snow globes lies in finding the right balance of liquid density and particle size. Baby oil is an excellent choice because it’s clear, safe to handle, and creates the perfect viscosity for that magical floating effect. The glitter or artificial snow particles should be fine enough to stay suspended but large enough to be visible as they fall.
Essential Materials for Snow Globe Making
You’ll Need:
Glass containers:
- Clean glass jars with tight-fitting lids (mason jars work perfectly)
- Baby food jars for smaller globes
- Spice jars for miniature versions
Decorative elements:
- Small ceramic, plastic, or resin figurines
- Waterproof decorative items (avoid metal pieces that may rust)
- Small artificial trees or plants
- Polymer clay figures (if you want to make your own)
Liquid and “snow”:
- Clear baby oil or mineral oil
- Fine glitter (avoid craft glitter that clumps)
- Artificial snow flakes
- Clear glycerin (optional, for extra slow motion effect)
Assembly supplies:
- Enamel paint or nail polish for lid decoration
- Hot glue gun and glue sticks
- Sandpaper (medium grit)
- Waterproof epoxy or aquarium-safe silicone
- Small funnel (helpful for adding materials)
Step-by-Step Snow Globe Creation Guide
Step 1: Prepare Your Container and Lid
Start by thoroughly cleaning your glass jar and lid, removing any labels and adhesive residue. Wash with warm, soapy water and dry completely—any soap residue can cloud your finished snow globe.
If your jar lid isn’t in seasonal colours or needs a refresh, this is the perfect time to customize it. Apply enamel paint in thin, even coats, allowing each layer to dry completely before adding the next. Nail polish works just as well and often provides better coverage in fewer coats. Consider festive colours like deep red, forest green, or metallic gold and silver for holiday-themed globes.
While the paint dries, gather your decorative elements and plan your scene. Consider the scale of your jar and how the items will look once the globe is filled with liquid. Remember that everything will appear slightly magnified through the curved glass.
Step 2: Create a Secure Base for Your Scene
The most critical step in snow globe construction is properly securing your decorative elements to the inside of the lid. Turn your lid upside down so the inside faces up—this will become the “ground” of your snow globe scene.
Use medium-grit sandpaper to rough up the smooth interior surface of the lid. This creates better adhesion for your glue and helps prevent figurines from shifting over time. Wipe away all dust with a clean cloth before proceeding.
Plan your layout carefully before applying any adhesive. Consider sightlines and how the scene will look from different angles when the jar is turned upright. Once you’re satisfied with the arrangement, use hot glue to secure each piece, applying extra glue around the base for stability.
Pro tip: For extra security, especially for heavier figurines, use waterproof epoxy instead of hot glue. While it takes longer to cure, it creates an incredibly strong bond that won’t fail over time.
Step 3: Add Your Magic “Snow”
Once your scene is completely dry and secure (wait at least 30 minutes for hot glue, 24 hours for epoxy), it’s time to add the materials that create the snow effect. This step requires a delicate touch to achieve the perfect balance.
Add your chosen “snow” material to the jar gradually. Start with just a pinch of fine glitter or artificial snow flakes, then test the effect by adding a small amount of baby oil and giving the jar a gentle shake. You can always add more snow material, but removing excess is much more difficult once the globe is sealed.
The goal is to create a swirling, dreamy effect without overcrowding the liquid. Too much material will create a blizzard that obscures your scene, while too little won’t provide the magical effect you’re seeking. Fine white or silver glitter typically works best, but don’t be afraid to experiment with subtle colours that complement your scene.
Step 4: Fill with Liquid and Test
Using a small funnel if available, carefully fill the jar almost to the top with baby oil, leaving about a quarter-inch of space at the rim. This air space is crucial—it allows for expansion and prevents overflow when the lid is attached.
Baby oil creates that perfect slow-falling effect that makes snow globes so mesmerizing. If you want an even slower effect, you can mix in a small amount of clear glycerin, but this isn’t necessary for most projects. Avoid using water as it causes particles to fall too quickly and may cause metal components to rust over time.
Give your proto-globe a gentle shake to test the snow effect. The particles should swirl gracefully and fall slowly through the oil. If they fall too quickly, the oil may not be viscous enough. If they barely move, you might have too much material creating congestion.
Step 5: Seal Your Creation
This final step requires patience and precision to ensure your snow globe doesn’t leak. Apply a generous bead of hot glue around the rim of the jar, then carefully thread the lid onto the jar. The figurines attached to the lid should slide smoothly into the liquid without disturbing your scene too much.
Tighten the lid firmly but don’t over-torque it, as this can crack the glass or break the seal. Wipe away any oil that may have spilled during assembly, then check for leaks by holding the jar upside down over a towel for a few minutes.
For extra security, especially if giving as gifts, apply a second seal of hot glue around the outside edge where the lid meets the jar. This creates a double barrier against leaks and gives the finished piece a more professional appearance.
Creative Theme Ideas for Every Occasion
Seasonal Celebrations
Winter Wonderlands: Create classic winter scenes with tiny evergreen trees, snowmen, and woodland animals. Use white and silver glitter for authentic snow effects.
Christmas Magic: Incorporate miniature Santa figures, tiny Christmas trees, and red and green glitter for festive holiday globes.
Spring Awakening: Use pale pink and yellow glitter with small flowers and butterflies for a gentle spring theme.
Summer Fun: Create beach scenes with palm trees and shells, using blue-tinted glitter to simulate ocean waves.
Personal Memory Keepsakes
Family Vacation Memories: Include small souvenirs or figurines representing special family trips. A tiny Eiffel Tower with silver glitter can commemorate a dream vacation to Paris.
Pet Portraits: Use small animal figurines that resemble beloved family pets, creating lasting memorials or celebration pieces.
Milestone Moments: Create graduation-themed globes with tiny books and caps, or baby-themed versions with soft pastel colours for new arrivals.
Educational Themes
Geography Lessons: Make globes representing different world regions, incorporating appropriate landscape elements and animals.
Historical Periods: Create scenes from different eras, helping children visualize historical lessons in an engaging, hands-on way.
Science Exploration: Build underwater scenes or space-themed globes to spark curiosity about marine biology or astronomy.
Troubleshooting Common Issues
Cloudy Liquid
If your snow globe liquid appears cloudy, the most common cause is soap residue from cleaning or impurities in the materials. Always rinse jars thoroughly after washing and use only clean, high-quality baby oil. If cloudiness appears after assembly, the issue may resolve on its own as particles settle, but persistent cloudiness usually requires starting over with fresh materials.
Particles Falling Too Quickly
When glitter or snow falls too fast, the liquid isn’t viscous enough. Baby oil should provide adequate thickness for most projects, but very fine particles may need a slightly thicker medium. Add a small amount of clear glycerin to increase viscosity, but do this gradually as too much can make particles barely move at all.
Leaking Seals
Leaks typically occur when lids aren’t tightened properly or when hot glue doesn’t create a complete seal. If you notice leaking, carefully remove the lid, clean both surfaces thoroughly, and reseal with fresh hot glue. For persistent leaking issues, consider using waterproof silicone sealant instead of hot glue.
Figurines Coming Loose
If decorative elements shift or detach after assembly, the adhesive wasn’t given sufficient time to cure or the lid surface wasn’t properly prepared. Prevention is key—always sand the lid surface and allow adhesives to cure completely before adding liquid. If pieces are already loose, you’ll need to disassemble the globe and start over with proper preparation.
Safety Considerations for Family Crafting
Adult Supervision Requirements
While snow globe making is generally safe for children, several steps require adult supervision. Hot glue guns reach temperatures that can cause burns, so adults should handle all hot glue application. Similarly, sanding should be done by adults to ensure proper technique and safety.
Age-Appropriate Modifications
For younger children (ages 4-7): Focus on decorating pre-prepared jars and choosing figurines. Adults handle all hot glue work and jar sealing.
For school-age children (ages 8-12): Allow participation in most steps with supervision, teaching proper safety techniques for tools and materials.
For teens: Encourage independence while providing guidance on technique and troubleshooting.
Material Safety
Always use child-safe materials, especially if young crafters might handle components. Baby oil is non-toxic but shouldn’t be ingested. Choose figurines without sharp edges or small parts that could pose choking hazards. Ensure all decorative elements are firmly secured before sealing to prevent them from becoming loose particles inside the globe.
Maintenance and Longevity Tips
Proper Display and Storage
Position your finished snow globes away from direct sunlight, which can cause oil to break down over time or colours to fade. Room temperature storage prevents expansion and contraction that could stress seals or crack glass.
Avoid placing snow globes near heat sources like radiators or heating vents. Extreme temperature changes can cause materials to expand at different rates, potentially compromising seals or clarity.
Cleaning and Care
Clean the exterior glass regularly with a soft cloth and mild glass cleaner, avoiding harsh chemicals that might damage painted lids or seals. Never submerge the entire globe in water as this could compromise the seal.
If the exterior becomes scratched, use fine automotive polishing compound to restore clarity, working in small circular motions and buffing to a clear finish.
When to Replace or Repair
Most well-made snow globes should last for many years with proper care. Signs that replacement might be necessary include persistent leaking, cloudy liquid that doesn’t clear, or damaged figurines that affect the overall appearance.
Minor issues like small air bubbles usually resolve themselves over time. However, if large air pockets develop or liquid levels drop significantly, the seal may have failed and the globe should be disassembled and rebuilt.
Advanced Techniques for Experienced Crafters
Creating Custom Figurines
For truly personalized snow globes, consider making custom figurines from polymer clay. These can be shaped to represent family members, pets, or specific memories. After shaping, bake according to clay manufacturer instructions and allow to cool completely before use.
Seal polymer clay figures with appropriate sealers to prevent any materials from leaching into the oil over time. Test pieces in a small amount of baby oil before incorporating into your final design.
Multi-Level Scenes
Create depth and visual interest by building scenes at different levels within the globe. Use clear fishing line to suspend lightweight elements at various heights, or build tiered platforms using waterproof materials.
This technique works particularly well for underwater scenes where fish can appear to swim at different depths, or winter scenes where birds seem to fly through falling snow.
LED Integration
For extra magic, consider incorporating battery-operated LED lights into your scenes. Small coin-cell powered LEDs can be hidden within scenes to create glowing effects. Ensure all electrical components are properly sealed and waterproofed before assembly.
Making Snow Globes Educational
Science Learning Opportunities
Snow globe construction naturally introduces concepts of density, viscosity, and gravity. Encourage children to experiment with different particle sizes and liquid types (under supervision) to understand how these variables affect the snow effect.
Discuss why oil works better than water for creating slow-falling particles, introducing concepts of molecular structure and fluid dynamics in age-appropriate terms.
Mathematics Applications
Use snow globe projects to practice measurement skills, calculating volumes needed for different jar sizes and ratios of materials. Older children can explore geometric concepts by designing scenes that demonstrate perspective and scale.
Cultural and Historical Education
Create globes representing different cultures or historical periods, using them as starting points for broader educational discussions. A globe featuring Egyptian pyramids can launch conversations about ancient civilizations, while a scene with maple leaves might explore Canadian geography and culture.
Conclusion: Creating Magic That Lasts
Making your own snow globes transforms simple materials into treasured keepsakes that capture imagination and create lasting memories. This accessible craft project combines creativity, learning, and family bonding in a way that produces beautiful, functional art pieces everyone can enjoy.
The magic of a homemade snow globe extends far beyond its swirling contents. Each shake brings back memories of the time spent creating it together, the excitement of choosing the perfect scene, and the satisfaction of watching your vision come to life. Whether displayed on a mantelpiece, given as heartfelt gifts, or tucked away as special treasures, these handcrafted globes carry with them the love and care invested in their creation.
As you embark on your snow globe making adventure, remember that perfection isn’t the goal—connection and creativity are. Each globe will be unique, reflecting the personality and imagination of its creator. Some may have perfectly positioned figurines while others might feature charmingly askew decorations, but all will hold the irreplaceable value of being made with love.
So gather your materials, call the family together, and prepare to create your own miniature winter wonderlands. With each gentle shake, you’ll be reminded that sometimes the most magical moments come not from store-bought treasures, but from the simple joy of creating something beautiful together.