Say goodbye to lost toys and travel meltdowns with this brilliant homemade solution
Any parent who’s travelled with a baby or toddler knows the struggle: toys constantly hitting the floor, little hands reaching for everything they shouldn’t touch, and the endless cycle of retrieving, sanitizing, and re-entertaining. But what if there was a simple solution that could transform your travel experience from chaotic to manageable?
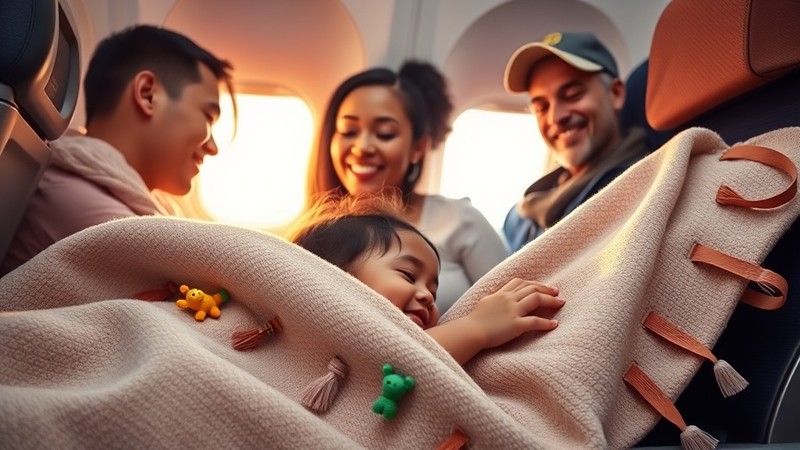
Enter the DIY travel blanket with ribbon tags and Velcro loops – a game-changing accessory that’s about to revolutionize how you travel with your little ones.
Why This Travel Blanket is a Parent’s Dream
The Problem Every Travelling Parent Faces
Picture this: You’re on a plane with your seven-month-old, trying to keep them entertained and contained while fellow passengers shoot you sympathetic (or not-so-sympathetic) glances. Your baby’s favourite teething ring has just bounced off three seats and landed on the grimy airplane floor – again. The overpriced rubber giraffe you bought at the airport has somehow wedged itself between seats, and your little one is starting to fuss because their entertainment has disappeared.
Sound familiar? This scenario plays out countless times on flights, in cars, and during travel adventures across Canada and beyond.
The Ingenious Solution
This DIY travel blanket addresses multiple travel challenges in one brilliant design:
Toy Security: Ribbon tags and Velcro loops keep favourite toys, teethers, and comfort items securely attached
Easy Cleanup: No more crawling under airplane seats or fishing toys out of car crevices
Built-in Storage: Strategically placed pockets hold books, snacks, and other essentials
Comfort Factor: Doubles as a cozy blanket for naptime during long journeys
Sensory Stimulation: The various textures and tags provide tactile entertainment
Materials You’ll Need for Your DIY Travel Blanket
Fabric Selection Tips
Choose fabrics that are both practical and appealing:
Main Blanket Fabric (1-1.5 yards):
- Soft flannel or minky for comfort
- Machine-washable materials are essential
- Consider fun patterns that will engage your child
- Darker colours help hide inevitable spills and stains
Accent Fabrics (½ yard total):
- Contrasting colours for pockets and trim
- Different textures for sensory appeal
- Coordinate with your main fabric choice
Additional Supplies:
- Various ribbon types (satin, grosgrain, textured)
- Velcro strips (both hook and loop sides)
- Coordinating thread
- Fabric scissors
- Sewing machine or hand-sewing supplies
- Pins or clips for fabric placement
Where to Source Quality Materials
Canadian Fabric Retailers:
- Pink Panda Fabrics (mentioned for their adorable selections)
- Local fabric stores often have unique Canadian-themed prints
- Online retailers with Canadian shipping for convenience
- Check for sales at major craft stores across Canada
Step-by-Step Construction Guide
Phase 1: Planning and Cutting
Design Your Layout:
- Sketch your blanket design, noting pocket placement
- Plan where Velcro loops will be positioned for maximum toy security
- Consider your child’s current favourite toys when planning attachment points
- Mark spots for different ribbon types and lengths
Cutting Your Fabric:
- Main blanket: 30” x 40” (adjustable based on your child’s size)
- Pockets: Various sizes from 4” x 4” up to 8” x 6”
- Ribbons: Cut various lengths from 4” to 8”
- Backing fabric: Same size as main blanket
Phase 2: Adding Interactive Elements
Creating Ribbon Tags:
- Fold ribbons in half and pin along blanket edges
- Space them 3-4 inches apart for optimal access
- Include different textures: smooth satin, textured grosgrain, soft velvet
- Secure with strong stitching – these will get plenty of tugs
Installing Velcro Loops:
- Cut Velcro into 2-3 inch strips
- Create loops by sewing the hook side to the loop side
- Attach loops at strategic points across the blanket surface
- Test with your child’s current toys to ensure proper fit
Adding Storage Pockets:
- Hem the top edge of each pocket piece
- Pin pockets in accessible but secure locations
- Sew three sides, leaving the hemmed edge as the opening
- Reinforce corners with extra stitching
Phase 3: Assembly and Finishing
Bringing It All Together:
- Layer the main fabric (right side up) with ribbons pinned in place
- Place the backing fabric right-side down on top
- Sew around the perimeter, leaving a 6-inch opening for turning
- Clip corners and turn right-side out
- Press seams and topstitch around the entire blanket
Quality Control Check:
- Test all Velcro attachments with actual toys
- Ensure ribbon tags are securely attached
- Check that pocket openings are properly finished
- Wash and dry to pre-shrink and test durability
Age-Appropriate Customization Ideas
For Babies (6-12 months)
Sensory Focus:
- Include crinkly material in pockets for sound stimulation
- Add textured ribbons for tactile exploration
- Attach teething-safe elements
- Use high-contrast colours for visual development
Safety Considerations:
- Ensure all attachments are securely sewn
- Keep ribbon lengths under 6 inches to prevent tangling
- Use baby-safe, non-toxic materials throughout
For Toddlers (1-3 years)
Interactive Elements:
- Create themed pockets (vehicles, animals, colours)
- Add snap closures or zippers for fine motor practice
- Include loops sized for favourite action figures
- Design detachable elements for independent play
Educational Opportunities:
- Incorporate numbers, letters, or shapes into the design
- Use fabric markers to create simple matching games
- Add different sized pockets for sorting activities
For Preschoolers (3-5 years)
Advanced Features:
- Create a simple board game surface with fabric paint
- Add button practice areas
- Include a clear pocket for holding activity sheets
- Design modular sections that can be rearranged
Maximizing Your Travel Blanket’s Effectiveness
Pre-Trip Preparation
Pack Smart:
- Rotate toys weekly to maintain novelty
- Include one new small toy as a special travel surprise
- Pack backup entertainment options in the pockets
- Bring wet wipes for easy cleanup
Test Run at Home:
- Use the blanket during car rides around town
- Let your child become familiar with all the features
- Practice attaching and detaching toys
- Identify any needed modifications before big trips
During Travel Success Strategies
Airplane Travel:
- Use the blanket during takeoff and landing for ear pressure comfort
- Attach only quiet toys to respect fellow passengers
- Utilize pockets for storing airport snacks and small water bottles
- The blanket works perfectly across most airplane tray tables
Road Trip Adventures:
- Secure the blanket to car seats with additional Velcro strips
- Rotate toys every hour to maintain interest
- Use larger pockets for car-specific activities like travel games
- The blanket provides perfect coverage for car seat naps
Hotel and Accommodation Use:
- Creates a familiar, comfortable space in new environments
- Doubles as a clean play surface on hotel floors
- Provides security blanket comfort in unfamiliar beds
- Easy to pack and carry between locations
Troubleshooting Common Challenges
When Toys Keep Falling Off
Quick Fixes:
- Check that Velcro loops are the right size for your toys
- Add additional attachment points if needed
- Consider using small carabiners for extra security
- Ensure toys have loops or attachable elements
If Your Child Loses Interest
Refresh Strategies:
- Introduce new toys specifically chosen for the blanket
- Create themed adventures using the pockets
- Let your child help choose which toys get attached
- Rotate available options to maintain novelty
Cleaning and Maintenance
Care Instructions:
- Machine wash in cold water with gentle detergent
- Air dry or use low heat to preserve Velcro effectiveness
- Check all attachments after washing for wear
- Replace worn Velcro strips as needed
Beyond Travel: Alternative Uses
Home Entertainment
Rainy Day Activities:
- Perfect for quiet time in bedrooms or living rooms
- Creates defined play space during indoor days
- Useful for containing small toys during cleanup time
- Provides sensory input when children need calming
Special Occasions and Visits
Grandparent Visits:
- Familiar comfort item in new environments
- Keeps favourite toys organized and accessible
- Provides independent play opportunities
- Easy for grandparents to understand and use
Medical Appointments:
- Offers distraction during waiting times
- Provides comfort during potentially stressful visits
- Keeps entertainment contained in small spaces
- Easy to sanitize after medical facility visits
Cost-Effective Family Solutions
Making Multiple Blankets
Shower Gifts and Sibling Sets:
- Create personalized versions for different children
- Perfect homemade gift for baby showers
- Coordinate colours with nursery themes
- Include care instruction cards with gifts
Community Projects:
- Organize sewing circles with other parents
- Share fabric costs and bulk purchasing
- Exchange ideas and pattern modifications
- Create matching sets for family trips
The Long-Term Benefits
Developmental Advantages
Skill Building Through Play:
- Fine motor development through toy manipulation
- Problem-solving skills with attachment systems
- Independence in managing personal belongings
- Responsibility for caring for special items
Emotional Comfort:
- Consistent comfort item across various environments
- Reduces anxiety during travel transitions
- Provides security in unfamiliar situations
- Creates positive associations with travel experiences
Family Harmony
Reduced Stress for Everyone:
- Parents spend less time retrieving dropped items
- Children stay engaged and content longer
- Siblings can have personalized versions to prevent conflicts
- Travel becomes more enjoyable for the whole family
Planning Your Next Family Adventure
With your DIY travel blanket complete, you’re ready to tackle any journey with confidence. Whether you’re planning a cross-Canada road trip, flying to visit family, or simply heading out for a day of errands, this blanket will transform your travel experience.
The beauty of this project lies not just in its practical benefits, but in the love and thoughtfulness you’ve sewn into every stitch. Your child will carry this comfort item through countless adventures, creating positive memories associated with travel and exploration.
Ready to Start Sewing?
Gather your materials this weekend and begin creating your family’s perfect travel companion. Once you experience the difference this simple accessory makes, you’ll wonder how you ever travelled without it. And don’t be surprised if other parents start asking where they can get one too – you might just find yourself starting a small business crafting these ingenious travel solutions for families across Canada!
Remember, the best family adventures begin with smart preparation. This DIY travel blanket isn’t just a sewing project – it’s an investment in calmer, more enjoyable family travels for years to come.